Connection
Download and install Radmin VPN on the local computer.
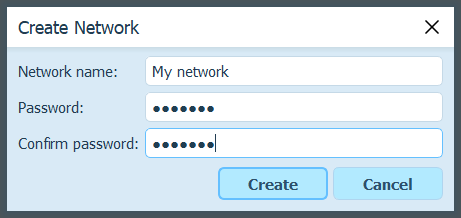
Create network:
-
Press "Create network" button.

-
Set Network name and Password.
-
Press "Create" button.
-
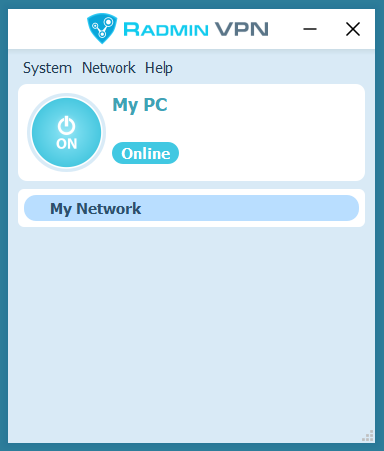
The new network will appear in Radmin VPN Main window.
-
-
Download and install Radmin VPN on the remote computer.
-
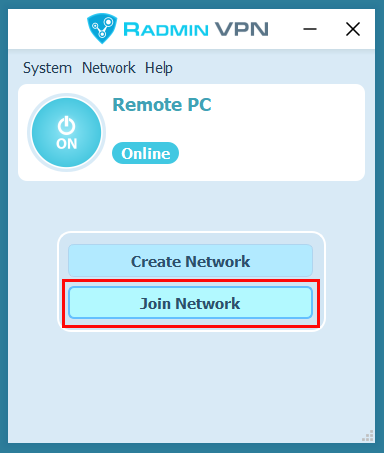
Launch the software and press "Join network" button.
-
Enter Network name and Password in the dialog box.

-
Press "Join" button.
-
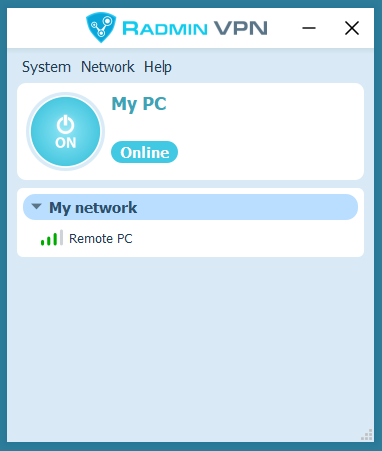
The network created earlier and its nodes will be shown in the Radmin VPN Main window.
-
The connection between the computers is established. You can check the connection by calling the "ping" command from the context menu of the remote computer.
Run Radmin VPN on the remote computer, find "Help->Install Radmin Server" in the main menu.
Add user and set user rights in settings for Radmin Server.
Connect local computer and remote one using Radmin VPN.
Choose: "Radmin-- > Full control" in the shortcut menu of the remote computer.
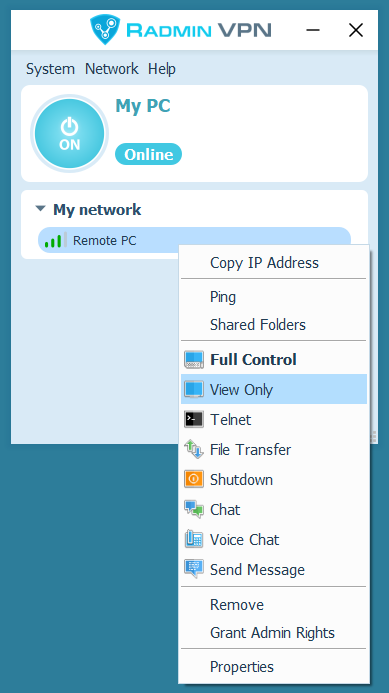
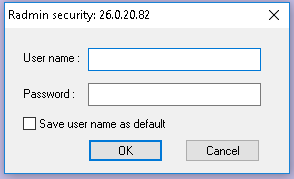
Enter user name and password which has been set in settings for Radmin Server.
Troubleshooting
Follow this link for all existing instructions.
If the game is not in the list, try Hamachi instructions; they often work.
To play with your friends, check the following:
You are within the same Radmin VPN network
You have the same game version
The hosting player added the game to the firewall exceptions (or turned off the firewall).
Perhaps at the moment you are the only one playing this game. Try connecting later or invite a friend to join.
Check the firewall and antivirus settings on your local and remote PC. Radmin VPN and the game should not be blocked by the antivirus or firewall (alternatively, you can disable them).
A Relay/TCP connection is established when a direct connection cannot be established. Try to join one of the gaming networks. If most of the connections to the participants of the gaming network are Relay/TCP, then the reason for this is most likely on your Internet provider side. Getting a public IP address from your provider or connecting through another Internet provider may help.
In this case, uninstall Radmin VPN, restart your PC, disable the antivirus, install Radmin VPN. If this didn’t help, create a ticket.
Click the round button in Radmin VPN to start the service.
In this case, uninstall Radmin VPN, restart your PC, disable the antivirus, install Radmin VPN. If this didn’t help, create a ticket.
If you have problems with deleting Radmin VPN, use a Microsoft utility.
- Download the utility and run it.
- Click Next and select Uninstalling.
- Select the Radmin VPN program and click Next.
- Wait for the utility to finish working and restart your PC.
Firewall setup
Click tray icon or label from Start menu to open Avast main window.
In Avast window select Protection menu.
Click Firewall.
Unfold menu for Current Network and find Adapter Description: Famatech Radmin VPN Ethernet Adapter.
In Firewall Profile column change entry to Private Network.
If this does not solve the issue, Firewall can be completely disabled. This operation is unsafe and can inflict harm on your computer.
To disable, click green slider and select time interval in Firewall window.
Click tray icon or label from Start menu to open My Dr.Web window.
In My Dr.Web window, select Security Center.
In Security Center window, select Files and Network.
Click closed lock icon to activate settings.
Click Firewall -> Advanced Settings.
In appearing Network menu item, click Change.
In Firewall Network window, select Network Interface Radmin VPN.
In Set of Rules dropdown list, select Allow All.
Click tray icon or label from Start menu to open ESET main window.
In ESET window select Setup menu.
In Setup menu select Network Protection.
Click Connected Networks.
In Connected Networks window click gear wheel near Virtual Network.
In appearing Change Network Settings window, under Protection Type, select Home or Office Network and click OK.
If this does not solve the issue, Firewall can be completely disabled. This operation is unsafe and can inflict harm on your computer.
In ESET window select Setup menu.
In Setup menu select Network Protection.
To disable, click green slider near Firewall and select time interval in appearing window.
Click tray icon or label from Start menu to open Kaspersky main window.
Click gear wheel in Kaspersky main window.
Go to Protection and select Firewall.
At the very bottom, click Available Networks.
Select Famatech Radmin VPN Ethernet Adapter.
Click Change.
Select Automatically Add New Networks in Group.
Select Trusted Network in the list and click Save.
In Do you really want to change settings? window click Yes.
Also, in Network Type column define Trusted Network in 26.0.0.0/8 row.
Click tray icon or label from Start menu to open McAfee Total Protection main window.
In McAfee Total Protection main window, click Parameters.
Click Firewall in appearing list.
In Firewall window, click Disable.
In appearing Disable Firewall window, select time and click Disable.
Click tray icon or label from Start menu to open My Norton main window.
In My Norton window click Open near Device Protection.
In appearing Norton Security window click Parameters gear wheel icon.
In Parameters window click Firewall.
In Firewall window at the bottom, find Network Reliability and click Setup.
In Reliability Level column select Full Reliability for Famatech Radmin VPN Ethernet Adapter and click OK.
If this does not solve the issue, Smart Firewall can be completely disabled. This operation is unsafe and can inflict harm on your computer.
To disable, click green slider near Smart Firewall, then click Apply.
Select time interval and click OK.